Authentication & Authorization
On-Terminal Apps
Every merchant’s business has business users (employees) that login to the terminal using their secure user id and passcode. Poynt Terminal maintains the authenticated sessions and enforces the session timeouts based on the user’s activity on the device. Applications running on the device can request an access token (JSON Web Token - JWT) that corresponds to the current user and use the token to authenticate their own requests to Poynt’s servers (we recommend using Authorization header with token type as BEARER). Application servers can validate the JWT using Poynt’s public key and extract the authenticated business user and business information from the token. This information can be used to establish identity federation link between 3rd party services and Poynt identities.
In case of on-terminal applications (which are typical Android apps), permissions are enforced through the usage of declarations in their AndroidManifest file. The merchant must authorize the application for the permissions requested during the time of the install.
On-Cloud Apps
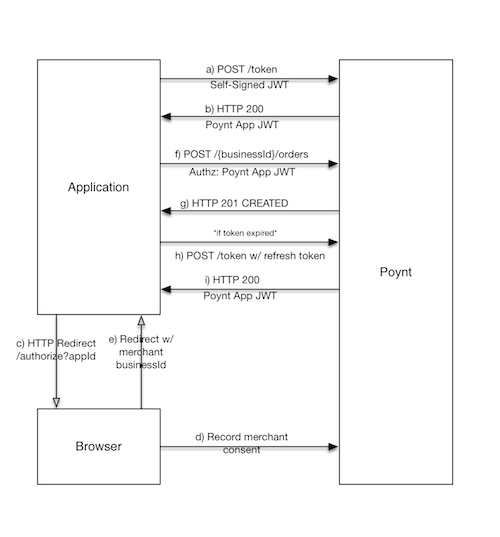
All Poynt RESTful APIs are OAuth 2.0 enabled using JSON Web Tokens (JWT) as OAuth access tokens. When a new application is registered with Poynt, an Application ID (urn) and API credentials are assigned to the application. The API credentials consist of an RSA public and private key pair. To authenticate your Application in the API calls, you must generate a JSON Web Token with your application ID as the issuer and subject, and sign it with the private key assigned to your application. Once the JWT is generated, you can use the OAuth 2.0 JWT assertion grant type to send your self-issued JWT and obtain a Poynt issued application JWT and a refresh token. Now, your API calls can then be authenticated using the Poynt issued JWT as the BEARER token.
To obtain permission to act on-behalf of a merchant (to access their data or service), you must redirect the merchant to Poynt Authorization URL along with your Application ID. Poynt’s Authorization endpoint will verify the identity of the merchant, request consent to the necessary information, record their approval, and redirect the merchant back to your application’s return URL along with the merchant’s business information your application needs for acting on behalf of the merchant.
Note on Refresh Tokens
As defined in OAuth 2.0 specification:
“Refresh tokens are credentials used to obtain access tokens. Refresh tokens are issued to the client by the authorization server and are used to obtain a new access token when the current access token becomes invalid or expires, or to obtain additional access tokens with identical or narrower scope (access tokens may have a shorter lifetime and fewer permissions than authorized by the resource owner).”
It is recommended that when an application is about to make an API call, it should first check for the validity of the access token by checking it’s expiry time. Note that due to clock synchronization issues, a token your app believes is valid might get rejected by Poynt Server as invalid/expired. Therefore, your app should always handle the case of receiving HTTP status code 401 (Unauthorized Request) by obtaining a new token using the refresh token.
Generating a JWT
What does a JWT claim set look like?
Sample JWT claim set:
{
  "sub": "urn:aid:ab0b4a96-6923-420f-ae10-217470f536da",
  "iss": "urn:aid:ab0b4a96-6923-420f-ae10-217470f536da",
  "jti": "6ce92dc0-9513-48f0-a7ae-d78322ea9d25",
  "exp": 1461791896,
  "iat": 1461791596,
  "aud": "https://services.poynt.net"
}
Here’s an explation of the JWT claims above:
 sub:  subject claim (your application ID)
 iss:  issuer claim (your application ID)
 jti:  jti claim (generated random UUID)
 exp:  expiration time claim (numeric epoch time in future)<br>(i.e. 500 seconds from now)
 iat:  issued at claim (numeric epoch time now)
 aud:  audience claim (Poynt API services endpoint)
Example: Generating Self-Signed JWT in Java
Here is a sample on how to generate a JWT using nimbus JWT library for Java. To use the same libraries, please add the following dependencies in your maven/gradle files.
compile 'net.jcip:jcip-annotations:1.0@jar'
compile 'com.nimbusds:nimbus-jose-jwt:3.9@jar'
compile 'net.minidev:json-smart:1.2@jar'
Sample Java Code:
// Create RSA-signer with the private key
JWSSigner signer = new RSASSASigner((RSAPrivateKey) keyPair.getPrivate());

// Audience for the cleaim set
final List < String > aud = new ArrayList < String > ();
aud.add(cloudConfig.getPoyntAPIHost());

// Prepare JWT with claims set
JWTClaimsSet claimsSet = new JWTClaimsSet();
claimsSet.setAudience(aud);
claimsSet.setSubject(deviceMetaData.getStoreDeviceId());
claimsSet.setIssuer(deviceMetaData.getStoreDeviceId());
claimsSet.setIssueTime(Calendar.getInstance().getTime());
claimsSet.setExpirationTime(fiveMinutesFromNow());
claimsSet.setJWTID(UUID.randomUUID().toString());
if (appSettings != null) {
  if (appSettings.getBusinessId() != null) {
         claimsSet.setCustomClaim(Claims.POYNT_BIZ, appSettings.getBusinessId().toString());
  }
  if (appSettings.getStoreId() != null) {
      claimsSet.setCustomClaim(Claims.POYNT_STORE, appSettings.getStoreId().toString());
  }
  if (appSettings.getStoreDeviceId() != null) {
     claimsSet.setCustomClaim(Claims.POYNT_DEVICE_ID, deviceMetaData.getStoreDeviceId());
  }
}
if (Strings.notEmpty(issuedTo)) {
   claimsSet.setCustomClaim(Claims.POYNT_ISSUED_TO, issuedTo);
}

SignedJWT signedJWT = new SignedJWT(new JWSHeader(JWSAlgorithm.RS256), claimsSet);

// Compute the RSA Signature
signedJWT.sign(signer);
return signedJWT.serialize();
Example: Generating Self-Signed JWT in Python
Below is a snippet of the Python code that shows how the JWT is formed and signed/encrypted with your application’s private key. You can download the full sample Python app on GitHub.
    payload = {
        'exp': expiryDatetime,
        'iat': currentDatetime,
        'iss': self.applicationId,
        'sub': self.applicationId,
        'aud': 'https://services.poynt.net',
        'jti': str(uuid.uuid4())
    }
    encodedJWT = jwt.encode(payload, self.rsaPrivateKey, algorithm='RS256')
Obtain access token and refresh token using your API credentials
Below is a sample API call to obtain access token and refresh tokens. We use place the <self-signed-jwt> generated above in the form POST data:
HTTP POST https://services.poynt.net/token
api-version: 1.2
Content-Type: application/x-www-form-urlencoded; charset=UTF-8
Content-Length: 814
grantType=urn%3Aietf%3Aparams%3Aoauth%3Agrant-type%3Ajwt-bearer&assertion=<self-signed-jwt>

HTTP 200 https://services.poynt.net/token
Content-Type: application/json;charset=UTF-8
Poynt-Request-Id: abcdefgh-1234-567a-901b-cdefghijklmn

{
    "expiresIn":86400,
    "accessToken":"<access-token>",
    "refreshToken":"<refresh-token>",
    "scope":"ALL",
    "tokenType":"BEARER"
}
Using refresh token to fetch a new access token
If an access token expires, you’ll need to fetch a new one using the refresh token. Below is a sample HTTP session performing that refresh.
HTTP POST https://services.poynt.net/token
api-version: 1.2
Content-Type: application/x-www-form-urlencoded; charset=UTF-8
Content-Length: 169
grantType=REFRESH_TOKEN&refreshToken=<your-refresh-token>

HTTP 200 https://services.poynt.net/token
Content-Type: application/json;charset=UTF-8
Poynt-Request-Id: bdceda34-7941-449d-88a6-cc28bf738fb9

{
    "expiresIn":86400,
    "accessToken":"<access-token>",
    "refreshToken":"<refresh-token>",
    "scope":"ALL",
    "tokenType":"BEARER"
}